There are important components in a typical water heater tank setup, such as a dip tube. The function is to transfer your main cold water from the top of the water heater tank to the tank’s base. This process ensures you have a fast circulation and heating of the water equally. The water heater dip tube will eventually need to be replaced, and this can be done by yourself.
What Is A Dip Tube In A Water Heater?
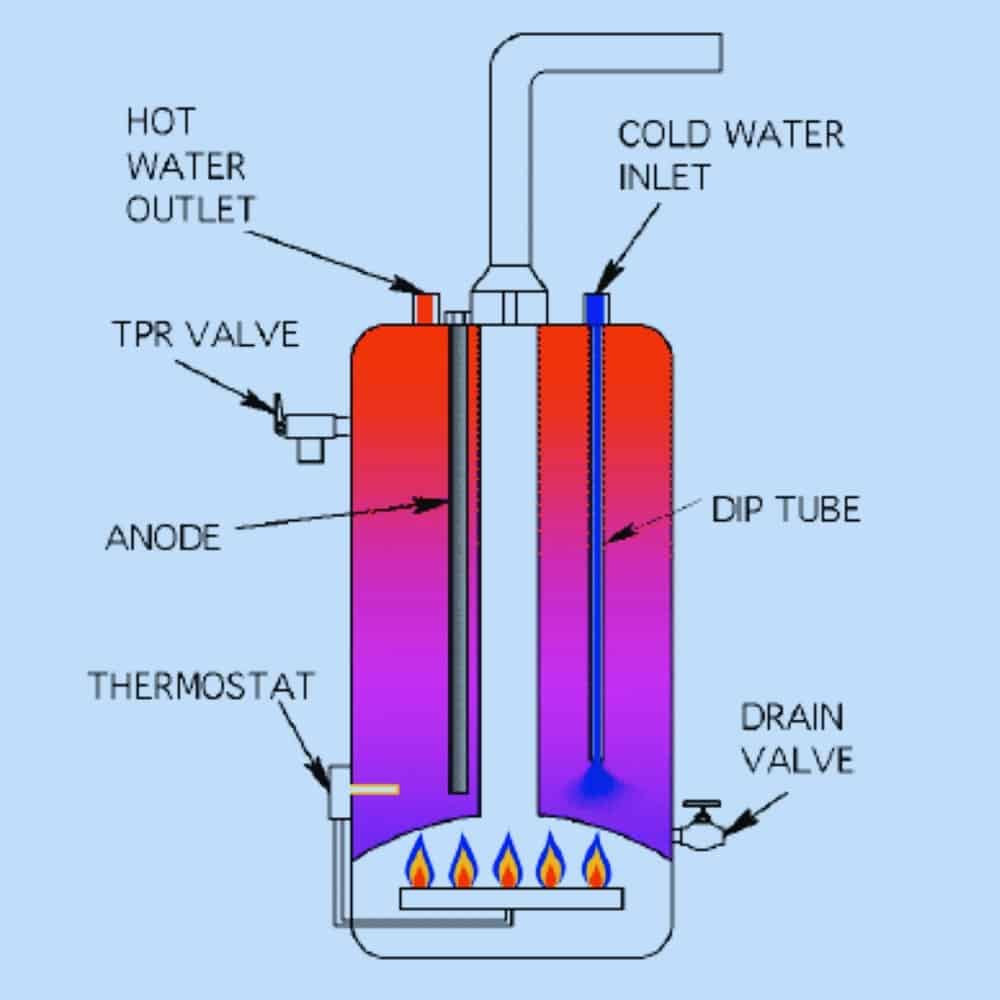
The water heater dip tube is a long tube (made from plastic) that fits into the water heater’s inlet and goes several inches from the bottom of the tank. Water heaters (gas or electric) are made up of two plumbing lines incoming and outgoing pipes. The incoming line inside the heater is the dip tube (also known as the dt tube).
The dip tube is created to direct the incoming water to the bottom of the heater. Without a dip tube, the cold water will mix with the hot water that already produces.
Signs of a Failing Water Heater Dip Tube
Like any component, the dip tube isn’t resistant to wear and tear. Recognizing the signs can save you from the unpleasant shock of an unexpected cold shower.
Inconsistent Water Temperature
Have you noticed a recent pattern of unpredictably lukewarm water? This inconsistency often signals a compromised dip tube, causing the cold and hot water to mix.
Reduced Water Pressure
Is your shower’s water pressure warning? A broken dip tube might allow water to bypass the heating process, disrupting the water flow and diminishing the pressure.
Consequences of a Defective Dip Tube
A malfunctioning dip tube spells trouble. Not only does it meddle with your comfort, but it also strains your water heater, as the system overworks to maintain the desired hot water levels, potentially precipitating premature wear, higher utility bills, and eventual system failure.
How To Replace Dip Tube In Water Heater?
Water heater dip tube replacement is easy (in theory). There is some task that can be very difficult. If you’re unsure about performing this DIY task, it’s in your best to call a professional technician.
Some manufacturers use a dip tube with a curved bottom that swirls the water around. It reduces sediment buildup and makes it easier to flush out. You can curve the end of a dip tube by heating it over a flame and bending it by hand.
Safety Before you start
- Turn off the gas/power units.
- For electric units, turn off the electrical switch in your electric board.
- Find the dial and swing it to either the “Off” or “Vacation” position for gas units.
Turn off the cold water inlet valve on top of the water heater and always close off the water at the meter or pump to be extra safe.
We cover this water heater dip tube replacement in extensive detail. The replacement task is a simple process that involves simple tools.
Step 1. Cut the power to the water heater.
Ensure that the power is off before performing any maintenance work on your dip tube water heater.
For an electric water heater, check the breaker at your circuit breaker panel that connects to your water heater and turn it off. If you have a gas water breaker, locate the “on/off” dial on your water breaker and turn it off.
Step 2. Turn the cold water inlet valve off.
Shut off the cold water supply to the water heater before performing dip tube replacement. The cold water shut-off valve is usually found just above the water heater.
Step 3. Drain a few gallons of water from the tank.
Clear any remaining water from the hot water pipes that are above the level of the top of the tank. This is done by draining a few gallons of water through the drain valve from the tank.
Step 4. Disconnect the cold-water supply line at the top of the water heater.
To remove the internal dip tube from your water heater, cut the pipe between the cold water shut-off valve and the water heater. Tighten the tubing cutter around the pipe and rotate until it is completely cut.
Some water may come out after you cut the pipe, although it may not be much.
Step 5. Remove the Dip Tube.
You will see your dip tube at the top of your water heater. It will typically have a pipe nipple remove the connector, and then you can begin the loosen the nipple counterclockwise with a wench. The dip tube is connected to the nipple; be careful when removing it as you could have a broken dip-tube.
Using a pipe wrench, remove the remaining pipe from the dip tube, followed by the dip tube itself. If you find your dip tube in good condition, other problems may affect it. However, if it is heavily corroded and there are missing chunks due to disintegration, you will likely need to replace the dip tube.
Step 6. Replace and Install the New Dip Tube.
With your new dip tube, wrap the threads with a plumber’s tape or with a pipe joint compound. This will seal the threads and prevent leaks.
Insert the dip tube into the tank, ensuring the tube is flush with the top of your tank, and then reconnect your pipes with a wrench.
Step 7. Refill the Water Tank.
Disconnect your hose and close the drain valve. Begin to turn the pressure relief valve counterclockwise to close it, then turn on all your hot water taps, and you can then open the inlet pipe valve.
You need to refill the water heater tank back with water, so open your cold pipe valve for this to allow the water back into the tank. Once you have left your water taps open for 3 mins, you can begin to close them.
This will remove any air and water in the system. After a successful flush, you can turn back the power to your tank and at your mains.
How Do I Know if My Dip Tube Need to Be Replace?
Water heater manufacturers from 1993-1997 were typically installed with a defective dip tube. After a few years of exposure to hot water, many disintegrate and break off.
Check the water heater serial number to know the age of your water heater. The first four numbers are usually the month and year of manufacture. If your water heaters have the numbers 93, 94, 95, 96, or 97 in the third and fourth digits, the dip tube may need to be replaced.
A simple task to test a broken dip tube is when you begin finding small bits of plastic in your faucet aerators, showerheads, clogging strainers, and filter screens on appliances.
How Much Does it Cost To Replace Dip Tube In Water Heater?
The average cost of replacing a water heater dip tube is around $75-$100. Depending on size, make, and model, water heater dip tubes price is $20-$40.
The cost of replacing a dip tube in a water heater can vary based on several factors, including whether you’re doing it yourself or hiring a professional, the cost of the dip tube itself, and possibly additional expenses depending on the condition of your water heater. Here’s a breakdown:
- Cost of the Dip Tube: The dip tube is not usually expensive. Depending on the make and model of your water heater, a new dip tube typically costs between $10 and $20. However, prices can vary slightly based on the brand and the supplier.
- DIY Installation: If you’re familiar with home plumbing projects, you might choose to replace the dip tube yourself. In this case, your primary expense is the cost of the dip tube. However, you should also consider the value of the proper tools if you don’t already have them and the time you’ll spend on the project.
- Professional Installation: Hiring a professional plumber for the job is more expensive but also more reliable. Labor costs for a plumber can vary significantly based on your location, the job’s complexity, and the plumber’s experience. You might expect to pay between $75 and $200 in labor costs alone. Some plumbers charge a flat fee, while others might bill you by the hour.
- Additional Costs: Sometimes, a plumbing job reveals other issues that must be addressed. While getting the dip tube replaced, the plumber might notice other parts needing repair or recommend preventive actions. These could lead to additional costs.
- Service Call Charge: Remember, some plumbing services have a minimum service call charge if you’re calling in a professional. You’ll pay this fee for having a professional come to your home to assess the situation, and it’s separate from the labor and parts costs.
Considering these factors, the total cost of DIY could be as little as $10 to $40 (just the part). In contrast, professional installation could raise the cost to anywhere from $100 to $300, including the service fee, part, and labor, not considering any unexpected complications or additional parts needed.
To get a more accurate estimate, it’s often a good idea to call a few local plumbers or plumbing services, describe your issue (including the make and model of your water heater), and ask for quotes. This approach will also let you compare prices and services, helping you make a more informed decision.
Where To Buy Dip Tube For Water Heater
Purchasing a dip tube for your water heater is typically a straightforward process. They’re readily available, but knowing where to look is crucial. Here are several places you can explore:
- Hardware Stores: Local hardware stores often carry various plumbing supplies, including dip tubes. Home Depot, Lowe’s, or your local hardware store likely have them in stock. Make sure to know the make and model of your water heater to ensure you purchase a compatible dip tube.
- Specialty Plumbing Stores: These stores focus on plumbing materials and offer various options with specialized staff that can advise and assist with installation inquiries.
- Online Retailers: Websites like Amazon, eBay, and others offer many options, often accompanied by user reviews to help you make an informed decision. You can search for the product and go through listings to find the right fit for your water heater model.
- Direct from Manufacturers: If you know the manufacturer of your water heater, check their website or contact them directly. Buying from the manufacturer can sometimes mean you get the part designed specifically for your model, ensuring compatibility.
- HVAC and Plumbing Service Providers: Professional service providers often carry or have immediate access to spare parts, including dip tubes. They can also provide professional installation, ensuring it’s done safely and correctly.
In buying a dip tube for your water heater, you must approach the purchase carefully and consider several factors.
Firstly, having detailed information about your water heater is crucial. This includes understanding your unit’s brand, model, and specific size requirements. Dip tubes are not one-size-fits-all, and installing an incompatible one could negatively impact the efficiency and functioning of your water heater. It’s much like finding a replacement part for a car; you need to know the exact make and model to ensure compatibility.
Additionally, warranties can be a lifesaver. If your water heater is still under warranty, contact the provider regarding replacements and repairs. Sometimes, the cost of a new dip tube might be covered under your warranty terms, or you might be able to obtain it at a discounted price. Furthermore, compatibility is key. Even outside of warranty concerns, confirming that the dip tube is suitable for your water heater model avoids unnecessary complications and expenses down the line.
Moreover, the quality of the replacement dip tube and its reviews should not be overlooked. In a world where online shopping provides convenience, it offers insight through customer reviews. Sifting through these reviews can provide a realistic expectation of the product you’re purchasing. Look for a dip tube that other buyers have praised for its durability and compatibility with different water heater models.
Finally, there’s no harm in admitting when you’re out of your depth. If you are uncertain, consulting a professional plumber or specialist is wise. They can provide expert advice, ensuring you purchase a suitable dip tube for your water heater. They might offer insights into the installation process. This step is about more than just making a purchase; it’s about preserving the longevity and functionality of your water heater.
Replacing the water heater dip tube is something that anyone can do and can help you save time and money on water heater repair. All you need are the right tools and the knowledge to do it. Feel free to comment on any problems you may have while doing water heater dip tube replacement.