Have you ever thought about the nitty-gritty involved in your water heater’s functioning, especially dealing with its electricity consumption? Understanding and installing an electric meter on your 240Volt water heater isn’t just a DIY milestone; it’s about ensuring efficiency, safety, and compliance with local regulations. This guide takes you through this seemingly complex process, simplifying each step for your comprehension.
Understanding Electric Meters
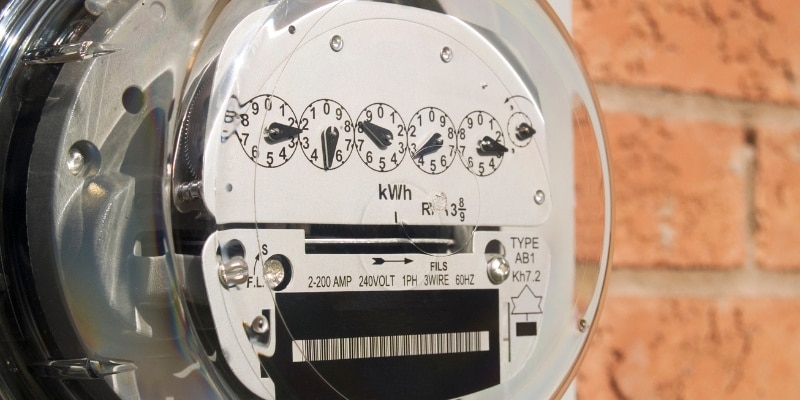
First, what exactly is an electric meter, and why should you care? Electric meters are the unsung heroes in our homes, working silently to record the amount of electrical energy consumed, ensuring you’re billed accurately by your utility company. They’re pivotal in monitoring usage, especially for appliances like water heaters that consume significant energy.

Investing in a kWh meter isn’t just for show; it’s your backstage pass to understanding your water heater’s performance. By recording the usage, you don’t have to play the guessing game with your utility bills. You’ll pinpoint exactly what slice of your bill the water heater munches on each month.
Want to go deeper? Challenge yourself. Limit your castle to showers only for a week and compare the costs against luxurious baths. You’ll uncover the stark differences in real time! And don’t stop there; keep an eye on hot water usage for routine tasks like laundry. These everyday activities are more intertwined with your energy consumption than you might think.
By personalizing your approach to monitoring energy usage, not only do you become more energy-savvy, but you also start to notice patterns and potential savings areas. It’s all about taking charge, one kilowatt-hour at a time!
Pre-Installation Considerations
Before we dive into the technicalities, let’s address safety – the aspect too vital to overlook. Working with electrical installations means exercising extreme caution. Are you wearing protective gear? Is your toolkit ready with screwdrivers, voltage testers, and wire strippers? Great, you’re set to go!
Now, onto your water heater. A 240Volt water heater is designed to handle a higher voltage, promising relaxing hot showers without a staggering utility bill. Unlike regular heaters, these require more finesse in installation and a good understanding of electrical systems.
Step-by-Step Installation Guide
Finally, the moment of truth – installing the meter. We’ve broken down the process to make it manageable, even enjoyable!
Step 1: Safety Checks – Never Assume Power is OFF
Before you even think about touching that meter, let’s talk safety. Get yourself a non-contact voltage tester. It will be your best friend, helping you check whether there’s power on the timer, wire, or outlet. Push its button; a single beep means you’re good to go, but a continuous beep? Danger zone! And please, stand on dry boards, not bare ground, to avoid shocking surprises. Remember, your safety is paramount!
Step 2: Review Electric Meter Installation
Now, onto the meter. This little gadget will be ‘stabbed’ into the meter box. It sounds violent, but it’s the term used for inserting the 4 prongs into the box. Give it a strong push; it should fit snugly, almost like plugging in an extension cord. And guess what? No screws or fasteners involved!
Step 3: Attach Wire to Meter Box/Socket
It’s time to flex those handyman’s muscles. But first – read those instructions that come with your meter. They’re your installation bible. Secure your meter box firmly; it’s the throne for your meter, after all. Using sturdy conduit or approved connections is non-negotiable. Next, connect the 240Volt wires from your circuit breaker to the top prongs inside your meter box. Screw those terminals down tight. This isn’t a place for loose connections!
Step 4: Attach 2nd Wire to the Meter Box
This step calls for your inner electrician to shine. You’re dealing with a 10 gauge wire specific to water heaters, comprising 2 hot wires and 1 ground wire. These buddies are crucial in the energy-reading process. Lay a new wire path between the water heater and the meter box. And see that orange-colored wire? That’s your go-to gauge. Stick to the same gauge as your original to maintain efficiency, and please don’t opt for a lesser gauge. You’re setting up an electric meter, not a Christmas tree!
Step 5: Finishing Details
Almost there! Ensure your meter box is as steadfast as a sentinel. Double-check all wiring against your manual – precision is key. Locate the latch on the back of your 120V-240V meters, ready for the final ‘stabbing’ process. Your meter should be nestled in its new home with one more hearty push. Flip the 240Volt circuit breaker ON and watch as your meter records the magical workings of your water heater.
The Real Cost of Running a Water Heater
Let me paint you a real-world picture to understand what we’re dealing with here. I embarked on a journey with my electric meter and water heater on a chilly day on 12-16-2011. The new and eager meter started with a reading of just 00005 Kwh. Fast forward to a sunny day on 5-30-18, and my trusty meter showcased a reading of 11732 Kwh.
Now, let’s dive into the math because numbers don’t lie. Over 6.41 golden years, my household, bustling with two people and a snug 30-gallon water heater, witnessed an average usage of 1827 kWh per year. Crunching those numbers with a 14¢ per Kwh rate, my wallet waved goodbye to approximately $255.8 annually. That, my friends, boils down to an estimated $21.32 monthly.
Why am I telling you this? Because understanding the energy consumption of your water heater puts you in the driver’s seat. You start to identify what’s siphoning off your cash!
And there you have it! You embarked on this journey as a novice, but now you’re well-versed in the art of installing an electric meter on a 240Volt water heater. Remember, the key lies in meticulous preparation, adherence to safety protocols, and precise execution. So, ready for a hot shower?


