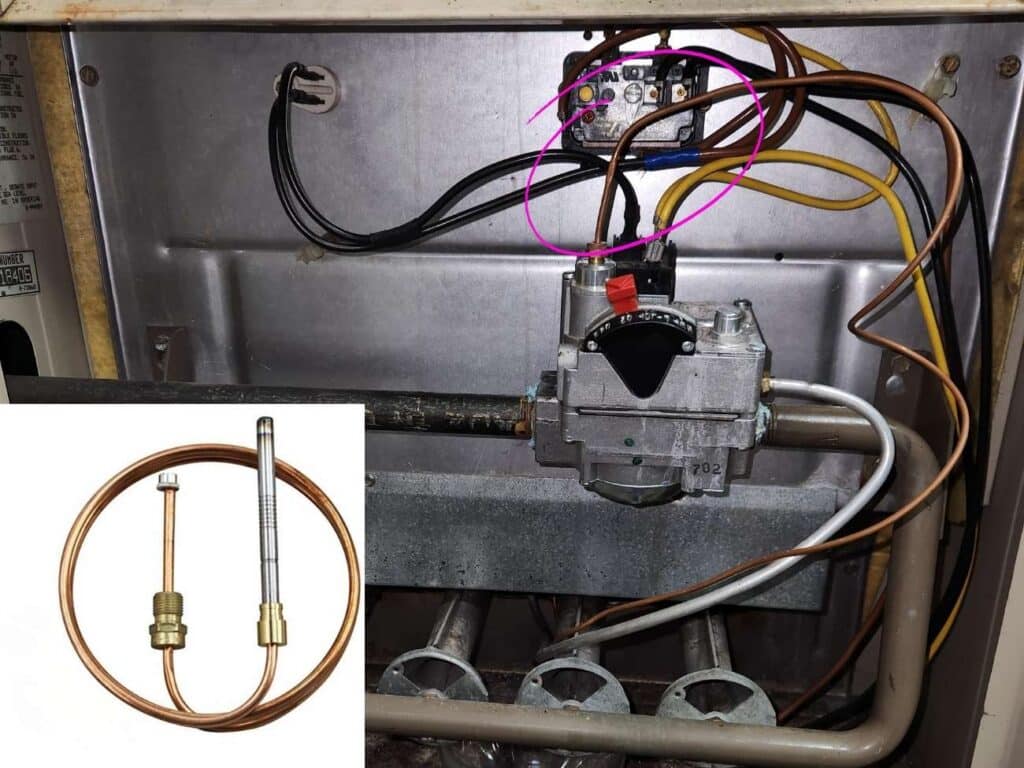
A thermocouple is a small but vital component of your gas furnace. It acts as a safety device, shutting off the gas supply if the pilot light goes out. If your furnace isn’t heating properly or the pilot light keeps going out, a faulty thermocouple might be to blame. Fortunately, replacing a gas furnace thermocouple is a task that many homeowners can handle themselves.
Let’s dive into this friendly, step-by-step guide to help you get your furnace back in working order.
What Is a Thermocouple?
Before we get started, let’s understand what a thermocouple does. This small device sits near the pilot light and senses whether the flame is lit. If the flame goes out, the thermocouple shuts off the gas valve to prevent gas from leaking into your home.

Over time, thermocouples can wear out or become dirty, causing them to malfunction.
Signs Your Furnace Thermocouple Needs Replacement
Here are some common signs that indicate it might be time to replace your furnace thermocouple:
- The pilot light won’t stay lit.
- Your furnace struggles to produce heat.
- The pilot light flame appears weak or flickers.
- The furnace cycles on and off more frequently than usual.
If you’ve noticed any of these issues, replacing the frunace thermocouple could solve the problem.
Step 1: Gather the Necessary Tools
Before you start, make sure you have the following tools and materials:
- A new thermocouple (ensure it’s compatible with your furnace model).
- Adjustable wrench or pliers.
- Screwdriver (usually Phillips or flathead).
- Safety gloves.
- A flashlight (to see into tight spaces).
Step 2: Turn Off the Power and Gas Supply
Safety first! Before you begin working on your furnace:
- Turn off the power to the furnace at the circuit breaker.
- Shut off the gas supply to the furnace by locating the gas valve and turning it to the “Off” position.
Step 3: Access the Thermocouple
Locate the thermocouple by removing the furnace’s access panel. The thermocouple is a small metal rod connected to the gas valve and positioned near the pilot light.
- Use a screwdriver to remove the screws securing the access panel.
- Set the panel and screws aside in a safe place.
Step 4: Remove the Old Thermocouple
To remove the faulty thermocouple:
- Disconnect from the gas valve: Use an adjustable wrench or pliers to unscrew the nut securing the thermocouple to the gas valve.
- Detach from the pilot assembly: Gently remove the other end of the thermocouple from the pilot light assembly. It’s usually held in place with a clip or small screw.
- Take note of the positioning: Before removing the thermocouple completely, note how it’s positioned so you can install the new one correctly.
Step 5: Install the New Thermocouple
Now it’s time to install the replacement thermocouple:
- Attach to the pilot assembly: Insert the end of the new thermocouple into the pilot light assembly. Secure it with the clip or screw, ensuring it’s positioned correctly.
- Connect to the gas valve: Screw the other end of the thermocouple into the gas valve. Tighten the connection with your wrench, but don’t overtighten, as this can damage the threads.
Step 6: Test the New Thermocouple
Once the new thermocouple is installed, it’s time to test your work:
- Turn the gas supply back on by setting the gas valve to the “On” position.
- Restore power to the furnace at the circuit breaker.
- Relight the pilot light by following the instructions in your furnace’s manual.
- Set your thermostat to call for heat and observe the furnace. If the pilot light stays lit and the furnace operates normally, you’ve successfully replaced the thermocouple.
Step 7: Replace the Access Panel
After testing the furnace, reattach the access panel with the screws you set aside earlier. Ensure everything is secure before stepping away from the furnace.
Essential Precautions
Before you start any work on your furnace, prioritize safety:
- Smell for Gas? STOP! If you smell a strong odor of gas, do not attempt to replace the thermocouple. This is a serious safety hazard. Immediately turn off the gas supply to the furnace (usually a valve on the gas pipe leading to the unit) and contact your gas company or a qualified HVAC technician. Gas leaks are dangerous and require professional attention.
- Power Down: Before working on any part of your furnace, turn off the power at the breaker box or the furnace’s power switch. This prevents any risk of electric shock.
- Turn Off the Gas Supply: In addition to shutting off the main gas supply if you smell gas, also turn off the gas supply to the furnace at the unit itself. This is usually a valve near the gas control valve.
- Let It Cool Down: If your furnace has been running recently, allow it to cool down completely before you start working on it. This will prevent burns.
Troubleshooting Tips
If your furnace still isn’t working after replacing the thermocouple, consider these troubleshooting tips:
- Double-check the connections to ensure they’re secure.
- Inspect the pilot light for a strong, steady flame. A weak flame could indicate a dirty pilot tube.
- Consult your furnace manual for additional troubleshooting steps.
- Call a professional HVAC technician if the problem persists.
Maintenance Tips for Your Thermocouple
To extend the life of your thermocouple and keep your furnace running smoothly, follow these maintenance tips:
- Schedule annual tune-ups: Professional maintenance can identify and address small issues before they become major problems.
- Keep the furnace clean: Dust and debris can affect the performance of your furnace components.
- Inspect the pilot light regularly: A steady blue flame indicates the pilot light is functioning correctly.
While replacing a thermocouple is a manageable DIY task, there are times when professional help is necessary. Contact an HVAC technician if:
- You’re uncomfortable working with gas or electrical components.
- The new thermocouple doesn’t resolve the issue.
- Your furnace has additional problems beyond the thermocouple.
Replacing a gas furnace thermocouple is a simple and rewarding task that can restore warmth to your home. By following this guide, you can confidently handle the replacement process and enjoy a properly functioning furnace. Remember, safety comes first, and don’t hesitate to seek professional assistance if needed. Stay warm and cozy!


