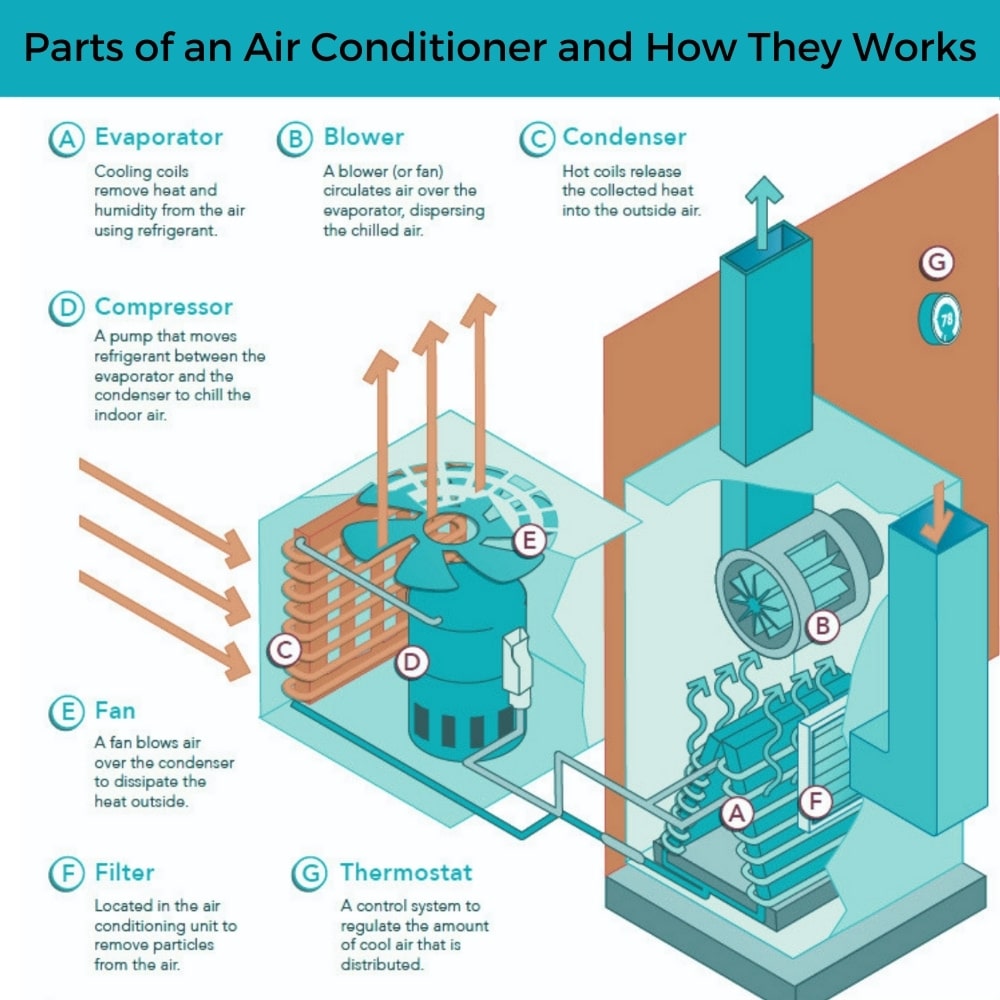
Air Conditioning systems consist of two separate units, one located inside and one located outside your home. The outside unit is commonly called the AC condenser because here is the condensation process happens. The air conditioner condenser cabinet houses the compressor, the condenser coil, and the fan motors and capacitors to supply power to the components.
Today we’re going to help you understand what can go wrong with the AC condenser, the common problems, and what you can do to avoid them!
What is An AC Condenser
The AC condenser located outside your home plays an essential role in the entire HVAC system. It is the component that is responsible for cooling and condensing the refrigerant vapor into liquid.
A bad AC condenser can cause many problems. For example, your air conditioner will lose the ability to cool the house. In some cases, it also causes a short-cycling process.
Sign of a bad AC condesner:
- Loud noises were coming from the outside unit.
- Significant decrease in cooling capability.
Unfortunately, when the AC condenser goes bad, it typically means that one or more parts in the condenser will have to be repair and/or replaced. Before you call the HVAC guy, try this basic AC condenser troubleshooting guide.
The Sequence of Control
The first step in troubleshooting your AC condenser is to understand how it works. The sequence of operation (also known as the sequence of control), the safety interlocks, and, in particular, what it is doing or not doing.

All of these items help to determine which course of action to take to bring your condensing unit back up to the original equipment manufacturer’s (OEM) specifications.
The procedures outlined below works for a heat pump as well for the most part, but heat pumps will not be discussed here.
Inside the AC condensing unit access panel, there is the control voltage system (normally the smaller wires) and the line voltage system (normally the larger wires). The control voltage in residential condensing units is 24 volts and begins at the thermostat.
As the name implies, the control voltage controls the relays and the safeties in the condenser. The line voltage in a residential air conditioner condenser is 120 or 240 volts. The line voltage begins at the electrical disconnect (normally mounted on the wall next to the condenser) and provides the operating power for the compressor and fan.
The sequence of control is the logic that your AC condenser follows to operate successfully. Some of the events are electronic, and others are mechanical. It all starts and ends with the thermostat. If all the events that follow the initial call for cooling are completed in the correct order, the condensing unit will operate and keep your home cool and crisp.
Every manufacturer has a sequence that is similar but could be different than what is described here.
The sequence is summarized as:
- A call for cooling
- Start condenser fan motor and compressor
- Start AHU (Air Handling Unit) fan
- Cool the home
- Satisfy thermostat
- System shut-down
The thermostat starts the cooling process, so make sure you have set it in the “cooling” mode, and the setpoint is lower than the room temperature. It sounds stupid to check the thermostat but just verify for yourself.
The thermostat will close its contacts and send the 24-volt control voltage to the condensing unit compressor relay, which energizes the compressor and fan inside the condensing unit.
Simultaneously, the thermostat also sends the 24-volt control voltage to the air handling unit fan relay, which energizes the supply air fan (which blows air across the cooling coil and into your ductwork system).
When the compressor relay is energized, the condenser fan and the compressor start. The fan has no safeties associated with it, so it will start automatically. The compressor, however, has several safeties to check before it starts. Normally these are wired in series with the compressor circuit or are controlled by a compressor protection module.
The normal safeties for the compressor protection module include the low-pressure switch, high-pressure switch, and compressor safety thermostat for protection. However, your unit may not have all of these safeties.
The low-pressure switch and high-pressure switch verify the refrigerant pressure. If it is too high or too low, the compressor will not start. The thermostat checks the compressor temperature and protects against an overheated compressor.
The air conditioner should operate if things are normal and continue to operate until the thermostat is satisfied and opens the contacts to the condenser and the supply air fan.
You may notice that the supply air fan in your AHU continues to operate after the condensing unit shuts down. This is normal and is caused by the supply air fan time delay, which allows the fan to operate an extra few minutes and extract all of the cooling produced by the AC condenser.
It adds a percent or two to the system’s efficiency by using the residual energy left in the cooling coil.
A Word of Caution
If you feel uncomfortable or in doubt about the procedures outlined below, make a service call to your HVAC technician. Electricity has no respect for anyone, and given the wrong series of events, could be dangerous. Remember, these units operate with electricity and a high-pressure refrigerant. Therefore, it is recommended to read the entire article before you start any repair procedures.
AC Condenser Problems and How to Avoid
AC condenser problems normally fall into two categories: It does not run, or it is not producing enough cooling. We will be discussing an AC condenser that does not run.
Before you begin troubleshooting:
- Verify the circuit breaker in the electrical panel has not tripped.
- Verify that you have line voltage at the disconnect of the condenser(normally 120 or 240 volts).
- Ensure the fuses at the disconnect are not blown (if you have them), and lastly, make sure all controls and switches are correct. You will need a multimeter to check these voltages but more importantly, BE CAREFUL!
Observe the AC Condenser Operation
First, remove the electrical access cover from the condensing unit. The relay is near the bottom of the access, and the capacitor is mounted to the side above the relay.
Have someone turn the thermostat down to call for cooling. This should start with the AHU supply air fan, the condensing unit compressor, and the fan.
If none of these three items happens, verify the drain pan water detector has not locked out the air handling unit.
Check the Drain Pan
Check for standing water in the drain pan and the emergency drain pan. If the pan is dry, begin troubleshooting the thermostat or the control voltage transformer.
As a test, locate the compressor relay in the condensing unit and check for 24 volts across the control contacts (the smaller wires most of the time).
If there is no control voltage, you probably need a new low voltage transformer or a problem with the wiring from the thermostat to the condensing unit.
Most of the time, transformers are located inside the condensing unit or the AHU. Disconnect the power to the transformer and look for nicks/burns in the wiring or broken connectors at the relay.
Correct this problem to see if the system will operate.
Check the Fan Motor
If the thermostat is doing its job, it will send 24 volts to the relay, energizing the AC fan motor and compressor.
A bad capacitor. Discolored and a slight bulge at the top of the capacitor.
If the fan does not start, it is probably the relay or the fan run capacitor. Different manufacturers use different equipment, so you could have a dual relay (receives a signal from thermostat and energizes fan and compressor), dual capacitor (gives compressor and fan motor an electrical boost), or a single piece of equipment that does both functions.
New capacitor installed. Make sure to match the rating of the old capacitor when you purchase it.
Check the line voltage circuit. Check for correct line voltage across the compressor relay. You should have line voltage into the relay, and when energized by the thermostat, line voltage out of the relay. If that checks out, look for a bulging capacitor(s) or an oily leak from the capacitor(s).
Remember, you could have two capacitors or a dual capacitor. Before you work on the capacitor, you will need to discharge it. Use an insulated screwdriver to short across the two (sometimes three) terminals on the capacitor.
Replace the relay and capacitor since these need to be replaced every five years or so. They are also inexpensive. Take pictures and sketch the terminals and wire colors.
After capacitor replacement, reassemble and test for condensing unit operation. For example, if the fan does not come on, you probably have a bad fan motor. Likewise, if the compressor does not come on, you need to troubleshoot the safeties.
Check the Compressor
Before you declare the compressor is bad, look around the interior of the condensing unit for a pressure transducer. It will be piped into the refrigerant tubing and have two wires leading back to the compressor protection module on the control board.
Investigate and determine if it has a manual reset (which is probably a small button). Unfortunately, not all units have a manual reset.
Check the Refrigerant Charge
You may or may not have refrigerant gauges, but your refrigerant pressure could be too high or low if everything else checks out. The pressure is more likely to be low rather than high. Low pressure indicates a leak in the piping system.
High pressures occur most often after a service call when the repairman has added too much refrigerant. If the refrigerant pressure is within tolerance, you are probably looking at purchasing a new compressor.
Call the HVAC technician
If you have made it this far by troubleshooting your condensing unit and it is still not operating, the repairs that need to be made will require the expertise of a service technician. I know. Not the news you wanted.
Conclusion
These are the most common failures that occur with the air conditioner condensing unit. Therefore, to provide your home with the most efficient, AC condenser coils needs to be regularly cleaned and serviced.


